How to Grow the Natural Loofah Sponge
Disclosure: Some of the links in this article may be affiliate links, which can provide compensation to me at no cost to you if you decide to purchase.
The Ultimate Guide: Growing Your Own Loofah Sponge
Loofah sponges are not only great for exfoliating and cleansing your skin, but they also make for an interesting and sustainable addition to your garden.
Did you know that loofahs come from a plant? Yes, they are actually a vegetable that you can grow in your own backyard!
In this comprehensive guide, we will walk you through the process of growing your own loofah sponge, from starting it from seed to transplanting, growth habits, when to plant, and ultimately, when and how to harvest it.
Let's get started!
1. Starting from Seed:
To begin your loofah sponge journey, you'll need to start with seeds. You can find loofah seeds at garden centers or purchase them on ETSY.
Start seeds indoors 4-6 weeks before the last frost date in your area. Fill a seed tray or small pots with a well-draining potting mix, and plant the seeds about ½ inch deep. Keep the soil consistently moist and provide them with sufficient light.
Once the danger of frost has passed, and the seedlings have developed a few sets of true leaves, they will be ready for transplanting.
2. Transplanting:
Choose a sunny location in your garden that receives at least 6-8 hours of direct sunlight daily. Loofah plants require warm temperatures to thrive, so make sure all chances of frost have passed before transplanting.
Prepare the soil by adding compost or well-rotted manure to improve drainage and fertility. Space the seedlings about 2-3 feet apart, allowing enough room for the vines to spread.
3. Growth Habits:
Loofah plants are vigorous climbers and require a sturdy trellis, fence, or arbor to support their sprawling vines. Ensure the structure is firmly anchored to withstand the weight of the growing plant. Last year my trellis collapsed because it was too flimsy.
As the loofah plant grows, gently guide the vines towards the support system. Once the vines start attaching themselves, they will continue to climb independently.
Regularly check and secure any loose or wandering vines to prevent damage.
4. Planting and Harvesting Times:
The ideal time to plant loofah seeds outdoors is when the soil has warmed up, usually after the last frost date.
Loofah thrive in warm climates, where the soil temperature reaches around 70°F (21°C). I
f you live in a cooler region, consider using black plastic or row covers to warm up the soil before planting.

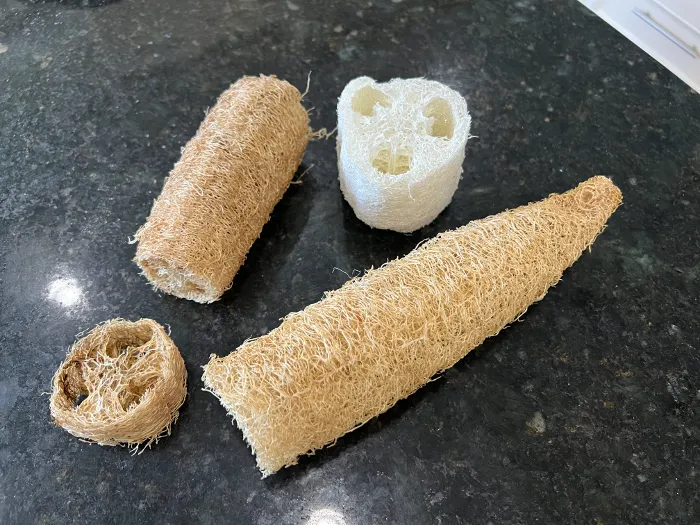
5. Harvesting:
Patience is key when it comes to harvesting loofah sponges. It typically takes around 150-200 days for the fruit to fully mature.

Harvesting is best done when the loofah gourds turn yellowish-brown and feel lightweight. I let mine dry out and will harvest when I can shake it and here the the sound of the seeds moving and hitting the sides of the loofah.
Use a sharp pair of scissors or pruning shears to cut the fruit from the vine, leaving a short stem attached.

6. Drying and Processing:
After harvesting, it's time to dry and process your loofah sponges. I let them dry with the outer skin on for a few weeks.
To prevent mildew, hang the loofahs in a well-ventilated area with good airflow and plenty of sunlight.
Once they are dry, you can gently shake them out to remove any remaining seeds. Only keep the black seeds.
Here are some creative craft ideas for using harvested loofah sponges:
1. Natural Bath Sponge:
The most obvious and practical use for loofah sponges is in the bath or shower. Once dried, you can cut the loofah into smaller sections, creating natural bath sponges. They provide gentle exfoliation and lather well with soap or body wash.
2. Soap Holders:
Cut a loofah into a cylindrical shape and secure the ends with a string or rubber band. This creates a unique and functional soap holder.
The loofah sponge will absorb excess water, helping to keep your soap dry and last longer.
You can also put them into a soap mold and use them while showering for a gentle exfoliation.
Refer to this article on step by step instructions on How to Make Soap from Garden Loofah Plants

3. Pot Scrubbers:
Loofahs' natural scrubbing properties make them perfect for cleaning dirty pots and pans. Cut a loofah into small, manageable pieces and use them as eco-friendly pot scrubbers. They are gentle on surfaces while effectively removing stubborn food residues.

4. Household Cleaning:
Loofah sponges can also be used for various household cleaning tasks. Cut them into smaller pieces and use them to clean countertops, sinks, and appliances. Their rough texture makes them great for tackling grime and stains.
5. Natural Art and Crafts:
Get creative with loofah sponges by using them in art projects. Dip them in paint and use them as stamps to create textured patterns on paper or fabric.

You can also cut the loofah into different shapes and sizes to make unique stencils or embellishments for mixed media art or scrapbooking.
6. Bird Feeders:
Repurpose a dried loofah sponge as a bird feeder. Fill it with birdseed and hang it from a tree branch or garden hook. The birds will be attracted to the seeds, and the loofah provides a natural and biodegradable feeder.
7. Planters and Seed Starters:
Loofahs can be used as eco-friendly planters or seed starters. Cut a loofah in half and fill it with potting soil. Plant small herbs or succulents directly into the loofah. As the loofah naturally decomposes, it provides nutrients to the plant.

8. Bath Accessories:
Get crafty and turn your loofahs into bath accessories. Sew a fabric pocket around the loofah and add a loop for hanging.

Fill the pocket with fragrant herbs, dried flowers, or soap petals to create a personalized and aromatic bath scrub.
TIPS:
Remember to thoroughly clean and dry your loofah sponges after each use to prevent bacterial growth. With these creative craft ideas, you can extend the usefulness of your harvested loofah sponges and add a touch of eco-friendly charm to your daily routine or home decor.
Growing your own loofah sponge can be a rewarding and educational experience. From starting the plant from seed to transplanting, nurturing, and finally harvesting the sponges, then making creative crafts will be fun experience for the whole family.
Happy Gardening!
Related Articles:
How to Make Soap from Garden Loofah Plants
Preserving Peony Flowers: The Marshmallow Bud Hack
Ergonomically Correct Garden Tools for Hand Pain or Arthritis
Disclosure: Some of the links in this article may be affiliate links, which can provide compensation to me at no cost to you if you decide to purchase.