Crafting Garden-Grown Loofah Soap: A Step-by-Step Tutorial
-
If so, then making your DIY loofah soap with loofah grown right in your garden is the perfect project for you!
-
Materials To Make Luffa/Loofah Soap:
- 1. Homegrown loofah: Harvested from your garden (or buy some below), this natural exfoliator is the star of the show.
- 2. Soap base: You have various options such as glycerin, goat's milk, shea butter, or coconut oil soap bases.
- 3. Soap colorant (optional): If you want to add a pop of color to your soap, choose a skin-safe soap colorant.
- 4. Essential oils (optional): Pick your favorite scents for a delightful fragrance.
- 5. Soap molds: Silicone molds work best for this project.
- 6. Microwave-safe container or double boiler: Used for melting the soap base.
- 7. Knife or grater: For cutting or grating the soap base.
- 8. Rubbing alcohol in a spray bottle: Helps eliminate bubbles and smooth out the soap.
- 9. Cutting board and knife: For trimming and preparing the loofah.
-
Links To Loofah Soap Supplies:
-
-
Step 1: Harvest and Prepare the Loofah
-
Step 2: Prepare the Soap Base
- 1. Cut or grate the soap base into small pieces. This speeds up the melting process.
- 2. Melt the soap base using a microwave-safe container or a double boiler. Microwave in 30-second intervals, stirring in between until fully melted. Be careful not to overheat.
- 3. Add color and fragrance (if desired) to the melted soap base. A few drops of soap colorant and essential oils go a long way.
-
Step 3: Assemble the Soap and Pour
- 1. Place the loofah sections into your silicone soap molds. Ensure they fit snugly.
- 2. Pour the melted soap base over the loofah sections in the molds. Fill them to the top.
- 3. Spritz the soap with rubbing alcohol to remove any air bubbles and create a smooth surface.
-
Step 4: Allow the Soap to Cool and Harden
-
Step 5: Un-mold and Trim
-
Step 6: Store and Enjoy
- More Garden Tips:
Disclosure: Some of the links in this article may be affiliate links, which can provide compensation to me at no cost to you if you decide to purchase.As an Amazon associate I may earn on qualifying purchases
Are you looking for a fun and eco-friendly way to elevate your skincare routine?
If so, then making your DIY loofah soap with loofah grown right in your garden is the perfect project for you!
Loofah soap combines the exfoliating power of natural loofah with the cleansing properties of soap, leaving your skin feeling refreshed and rejuvenated.
In this step-by-step tutorial, we'll guide you through the process of creating your DIY garden-grown loofah into soap using various soap bases.
Materials To Make Luffa/Loofah Soap:
1. Homegrown loofah: Harvested from your garden (or buy some below), this natural exfoliator is the star of the show.
2. Soap base: You have various options such as glycerin, goat's milk, shea butter, or coconut oil soap bases.
3. Soap colorant (optional): If you want to add a pop of color to your soap, choose a skin-safe soap colorant.
4. Essential oils (optional): Pick your favorite scents for a delightful fragrance.
5. Soap molds: Silicone molds work best for this project.
6. Microwave-safe container or double boiler: Used for melting the soap base.
7. Knife or grater: For cutting or grating the soap base.
8. Rubbing alcohol in a spray bottle: Helps eliminate bubbles and smooth out the soap.
9. Cutting board and knife: For trimming and preparing the loofah.
Links To Loofah Soap Supplies:
Loofah Seeds: https://inthegardensue.etsy.com/listing/1559180898
Loofah: 
Amazon links to supples:
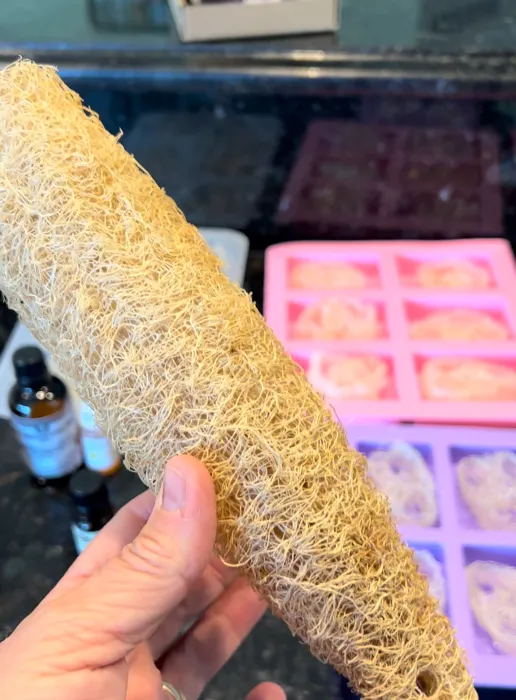
Step 1: Harvest and Prepare the Loofah
Before you start crafting your loofah soap, ensure your garden-grown loofah is ready for use.
Here's how: (check out my Ultimate Guide to Growing Loofah here)
- Harvest the mature loofah gourd from your garden when it turns brown and feels lightweight.

- Peel off the outer skin to reveal the fibrous interior.
- Rinse the loofah thoroughly to remove any remaining plant matter. Dry thoroughly.
- Cut the loofah into 1-2 inch sections, depending on your soap mold's size.

Step 2: Prepare the Soap Base
Now it's time to prepare the soap base. You can choose from various soap bases depending on your skin's needs and personal preferences.
1. Cut or grate the soap base into small pieces. This speeds up the melting process.

2. Melt the soap base using a microwave-safe container or a double boiler. Microwave in 30-second intervals, stirring in between until fully melted. Be careful not to overheat.
3. Add color and fragrance (if desired) to the melted soap base. A few drops of soap colorant and essential oils go a long way.
Step 3: Assemble the Soap and Pour
Now comes the fun part – assembling your loofah soap.
1. Place the loofah sections into your silicone soap molds. Ensure they fit snugly.
2. Pour the melted soap base over the loofah sections in the molds. Fill them to the top.

3. Spritz the soap with rubbing alcohol to remove any air bubbles and create a smooth surface.
Step 4: Allow the Soap to Cool and Harden
Place the soap molds in a cool, dry place to allow the soap to harden. This typically takes a few hours or overnight, depending on the soap base used and the size of your molds.

Step 5: Un-mold and Trim
Once the soap has completely hardened, carefully un-mold the loofah soap bars from the silicone molds. If needed, trim any excess soap around the edges for a neater appearance.

Step 6: Store and Enjoy
Now that your garden-grown loofah soap is ready, store it in a cool, dry place. Your shower or bath routine just got a luxurious upgrade! These loofah soaps make fantastic gifts, too.

Conclusion:
Creating loofah soap from loofah grown in your garden is not only a rewarding DIY project but also a fantastic way to enhance your skincare routine. With endless options for soap bases, colors, and scents, you can customize your soap to suit your preferences. So, roll up your sleeves, gather your garden-fresh loofah, and start crafting your own spa-worthy loofah soap today! Your skin will thank you.
Happy Gardening and Crafting!
More Garden Tips:
5 Tips for Saving Flowers Seeds
Planting Bulbs in a Flower Pot: The Lasagna Method
Review of 3 Best Garden Kneeler Seats for Seniors
The Best Hand Pruners for Arthritic Hands: A Review
-
If so, then making your DIY loofah soap with loofah grown right in your garden is the perfect project for you!
-
Materials To Make Luffa/Loofah Soap:
- 1. Homegrown loofah: Harvested from your garden (or buy some below), this natural exfoliator is the star of the show.
- 2. Soap base: You have various options such as glycerin, goat's milk, shea butter, or coconut oil soap bases.
- 3. Soap colorant (optional): If you want to add a pop of color to your soap, choose a skin-safe soap colorant.
- 4. Essential oils (optional): Pick your favorite scents for a delightful fragrance.
- 5. Soap molds: Silicone molds work best for this project.
- 6. Microwave-safe container or double boiler: Used for melting the soap base.
- 7. Knife or grater: For cutting or grating the soap base.
- 8. Rubbing alcohol in a spray bottle: Helps eliminate bubbles and smooth out the soap.
- 9. Cutting board and knife: For trimming and preparing the loofah.
-
Links To Loofah Soap Supplies:
-
-
Step 1: Harvest and Prepare the Loofah
-
Step 2: Prepare the Soap Base
- 1. Cut or grate the soap base into small pieces. This speeds up the melting process.
- 2. Melt the soap base using a microwave-safe container or a double boiler. Microwave in 30-second intervals, stirring in between until fully melted. Be careful not to overheat.
- 3. Add color and fragrance (if desired) to the melted soap base. A few drops of soap colorant and essential oils go a long way.
-
Step 3: Assemble the Soap and Pour
- 1. Place the loofah sections into your silicone soap molds. Ensure they fit snugly.
- 2. Pour the melted soap base over the loofah sections in the molds. Fill them to the top.
- 3. Spritz the soap with rubbing alcohol to remove any air bubbles and create a smooth surface.
-
Step 4: Allow the Soap to Cool and Harden
-
Step 5: Un-mold and Trim
-
Step 6: Store and Enjoy
- More Garden Tips:
Disclosure: Some of the links in this article may be affiliate links, which can provide compensation to me at no cost to you if you decide to purchase.As an Amazon associate I may earn on qualifying purchases