Plant a Cut Flower Garden in 5 Easy Steps
Disclosure: Some of the links in this article may be affiliate links, which can provide compensation to me at no cost to you if you decide to purchase. As an Amazon associate, I may earn on qualifying purchases
Dreaming of fresh bouquets straight from your backyard?
Planting a cut flower garden is easier than you think—and incredibly rewarding. With just a little planning and a patch of soil, you can grow armfuls of beautiful blooms to enjoy all season long.
Here’s how to start your own cut flower garden in your backyard in five simple steps.
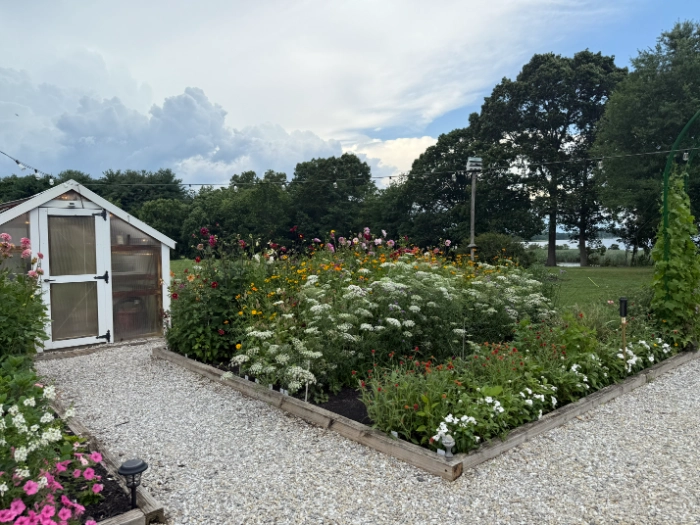
1. Choose the Right Spot
Sunlight is key. Most cut flowers thrive in full sun, so pick a spot that gets at least 6–8 hours of direct light daily. Make sure the area has good drainage and easy access to water. If space is limited, raised beds or containers can work just as well.

Tip: Tall flowers fall over easily, especially in windy spots. Use staking, organize your planting by height so flowers support one another, or install trellis netting to keep everything upright.
In this picture I have started the first lower layer of netting to hold the flowers upright as they grow. I have found this to be a game changer for my garden
Check the Hortonova netting out that I use here: (on Amazon)

2. Plan Your Flower Selection
This is the fun part—choosing the flowers! Select varieties that bloom continuously or rebloom after cutting to keep your vases full all season. Many cut flowers are “cut and come again,” meaning the more you harvest, the more they produce.
Include a variety of shapes, colors, and textures for dynamic bouquets.
Pick a mix of annuals (which bloom fast and abundantly) and perennials (which return year after year).
Top picks for cut flowers:
Zinnias – bright, bold, and long-lasting
Cosmos – soft, airy, and prolific
Snapdragons – vertical structure and great vase life
Celosia – striking texture in both plume and cockscomb varieties
Gomphrena – drought-tolerant with adorable globe-like blooms
Billy Buttons (Craspedia) – unique round yellow flowers that dry beautifully
Pot Marigold (Calendula) – cheerful, long bloom time, and easy to grow
Dahlias – showstoppers that bloom later and make a huge impact
Hydrangeas- shrubs with big showy clusters of flowers in white, pink, blue and purple

Planning Tip: Use a garden planner or a free online garden planner to sketch your layout before planting. I published my own garden planner after years of planning gardens in a notebook. Check it out here (on amazon)
This helps with spacing, crop rotation, and visual balance. Arrange your garden in rows or blocks by height and bloom time for easy maintenance and continuous harvests.
3. Prep the Soil
Before you plant anything, get a soil test. Your local extension office often provides affordable testing, and it will tell you exactly what your soil needs in terms of nutrients and pH balance. Read more here about soil testing from University of Maryland Extension Service.
Starting with good soil health saves money on unnecessary amendments and helps plants thrive from the beginning.
Loosen the soil to about 6-12 inches deep, remove weeds, and mix in compost or organic matter.
If needed, add amendments based on your soil test results. Well-amended soil retains moisture but drains well—crucial for healthy root growth.
4. Plant with Purpose
Many cut flowers are easy to grow from direct seed, meaning you can plant them right into your garden without starting them indoors. Zinnias, cosmos, calendula, and gomphrena are all excellent candidates for this.
If you want a head start on the season, consider using grow lights to start seeds indoors 4–6 weeks before your last frost. This method can extend your bloom time and give you earlier flowers.
These are the grow lights I bought here on amazon

Efficiency Tips:
Install drip lines or soaker hoses to deliver water directly to the roots and save yourself daily watering.
Lay down landscape fabric before planting and burn holes for each seedling. This greatly reduces weeding and keeps your rows tidy.


This is what I use, but they do make smaller propane torch versions here on Amazon
Follow spacing guidelines and plant in succession—sowing seeds every few weeks—to keep the flowers coming. Water thoroughly after planting and keep the soil moist while seeds germinate and young plants establish.
5. Harvest and Maintain
Cut flowers regularly to encourage more blooms. Harvest early in the morning with clean snips, and always cut above a leaf node to keep the plant productive.
To keep your garden in peak condition:
Deadhead or harvest flowers often
Mulch or maintain your landscape fabric to suppress weeds
Use plant supports for taller varieties
As the season ends, let some flowers go to seed. You can collect and save seeds for next year, which saves money and helps you select your strongest, most productive plants. Store seeds in a cool, dry place in labeled envelopes or jars for planting next spring.
Final Thoughts
With a little planning, some soil prep, and the right flowers, you’ll have a blooming cut flower garden that keeps on giving. From seed to vase (and back again), the process is simple, satisfying, and beautiful.
Ready to get planting? Your bouquets await!
More fun Articles to Read:
Create A Wildflower Meadow: Our Simple Guide
Best Tiller for a Small Garden
Best Hand Pruners for Small Hands
Disclosure: Some of the links in this article may be affiliate links, which can provide compensation to me at no cost to you if you decide to purchase. As an Amazon associate, I may earn on qualifying purchases